Windows Operating Systems
- SOP Template - DO NOT USE
- Applications
- Powershell
- Audio
- Registry Hacks
- SOP Template - DO NOT USE
- How to Setup Auto Login for Windows 10 without netplwiz (non-licensed Windows 10)
- Debloating Tools
- Gaming
SOP Template - DO NOT USE
| Author |
Date |
Revision |
| Related product (if any): |
|
| Description: | |
| Symptoms: |
|
| Cause: |
|
| Files Needed: |
|
| Steps to Correct: |
Applications
Documentation on apps like Discord, Google Chrome, etc.
SOP Template - DO NOT USE
| Author |
Date |
Revision |
| Related product (if any): |
|
| Description: | |
| Symptoms: |
|
| Cause: |
|
| Files Needed: |
|
| Steps to Correct: |
Powershell
Powershell commands and scripts.
SOP Template - DO NOT USE
| Author |
Date |
Revision |
| Related product (if any): |
|
| Description: | |
| Symptoms: |
|
| Cause: |
|
| Files Needed: |
|
| Steps to Correct: |
Windows Powershell - Creating an Audio Alert when PC starts Overheating
| Author |
Date |
Revision |
| Caleb Brendel |
05/04/2024 | 1.0 |
| Related product (if any): |
N/A |
| Description: | N/A |
| Symptoms: |
N/A |
| Cause: |
N/A |
| Files Needed: |
N/A |
| Steps to Correct: |
|
Audio
Adjusting audio on Windows(10/11) and how to utilize it.
SOP Template - DO NOT USE
| Author |
Date |
Revision |
| Related product (if any): |
|
| Description: | |
| Symptoms: |
|
| Cause: |
|
| Files Needed: |
|
| Steps to Correct: |
Registry Hacks
Registry Hacks I am aware of to extend the ability of Windows.
SOP Template - DO NOT USE
| Author |
Date |
Revision |
| Related product (if any): |
|
| Description: | |
| Symptoms: |
|
| Cause: |
|
| Files Needed: |
|
| Steps to Correct: |
How to Setup Auto Login for Windows 10 without netplwiz (non-licensed Windows 10)
| Author |
Date |
Revision |
| Caleb Brendel |
04/08/2024 |
1.0 |
| Related product (if any): |
|
| Description: |
Registry hack meant for Windows 10/11 in cases where you don't have a copy of Windows. Example: a Windows VM |
| Symptoms: |
N/A |
| Cause: |
This is used in cases where netplwiz is unusable on Windows 10/11. This can happen if you are on an unlicensed copy of Windows. This registry hack will bypass that. |
| Files Needed: |
N/A |
| Steps to Correct: |
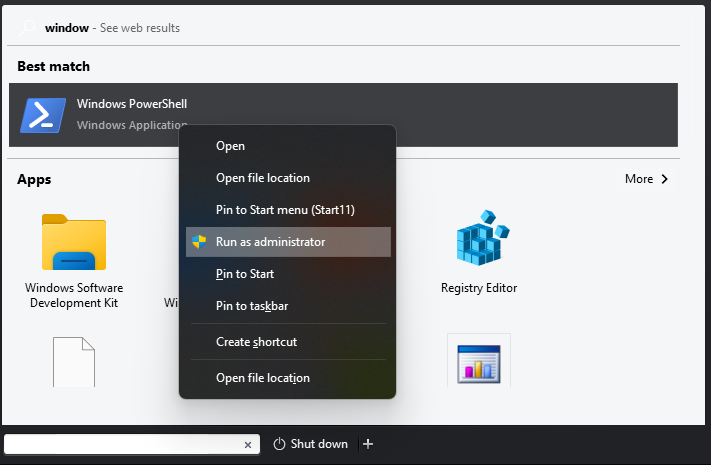
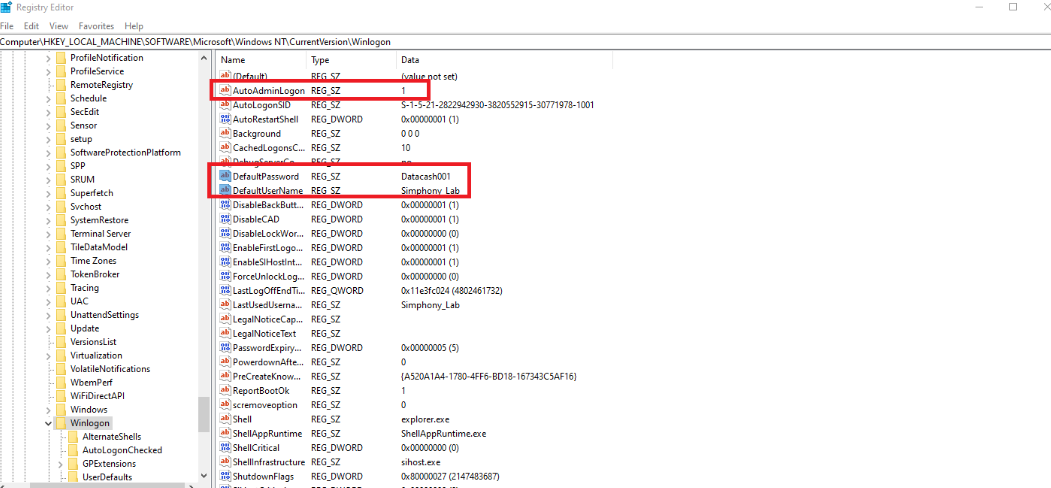
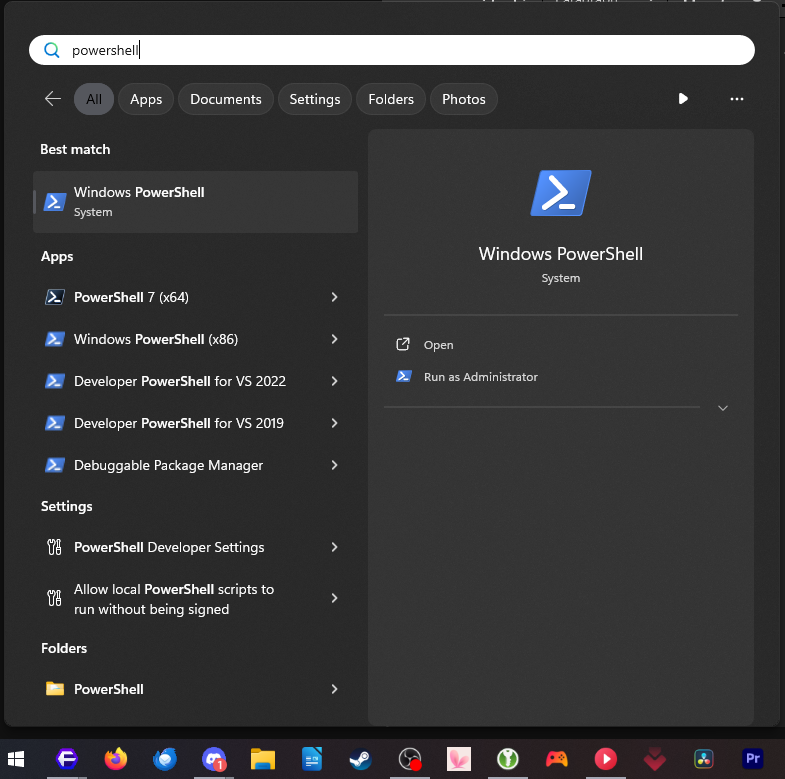
Typically people will have licensed Windows machines. It's not like they can't operate fine without the license anyway...lol. So, here is the method I use for clients when it comes to registry hacks for auto-signing into a local account on Windows 10! Open Registry Editor by searching it in the Windows search in the bottom left of your taskbar:
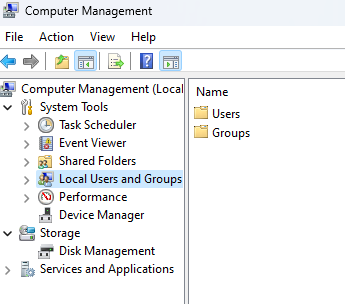
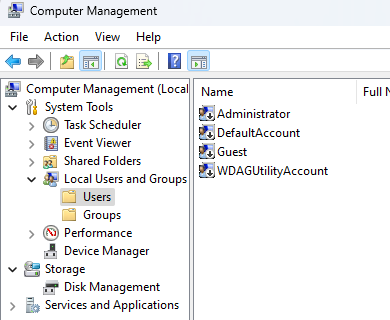
Now add 3 string values and rename them all to the following: You can check what username you use on your pc by going into Computer Management. You can search this down below in the Windows search bar.
Inside of Computer Management, select Local Users and Groups.
Now double click on Users.
Administrator is a good example here so that's what you would end up putting in the DefaultUsername string in the Registry Editor.
|


Debloating Tools
SOP Template - DO NOT USE
| Author |
Date |
Revision |
| Related product (if any): |
|
| Description: | |
| Symptoms: |
|
| Cause: |
|
| Files Needed: |
|
| Steps to Correct: |
Chris Titus Tech's WinUtil Powershell Script
| Author |
Date |
Revision |
| Caleb Brendel |
04/08/2024 |
1.0 |
| Related product (if any): |
|
| Description: | This script is used to remove "bloatware" on Windows so it can help perform better. |
| Symptoms: |
|
| Cause: |
Wanting to remove Microsoft Store-related apps/services to improve performance on your system. |
| Files Needed: |
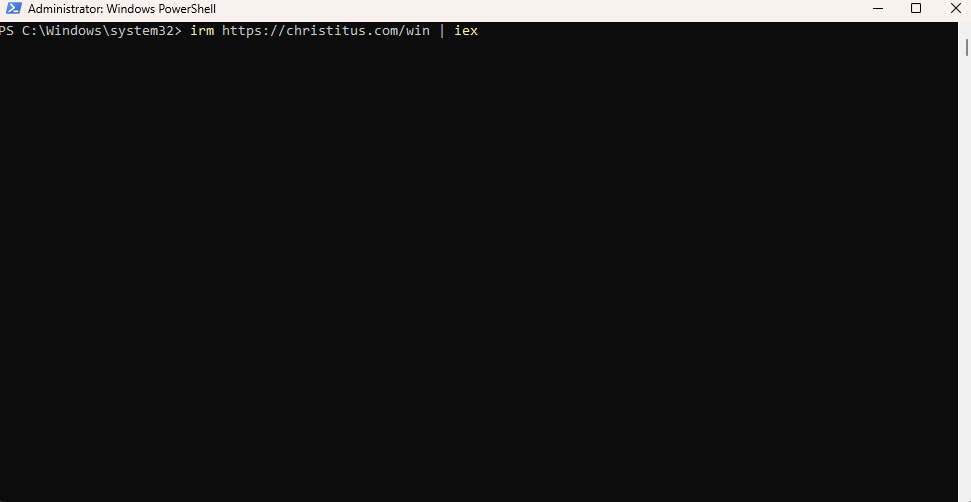
No files are needed except for the script to run: irm https://christitus.com/win | iex |
| Steps to Correct: |
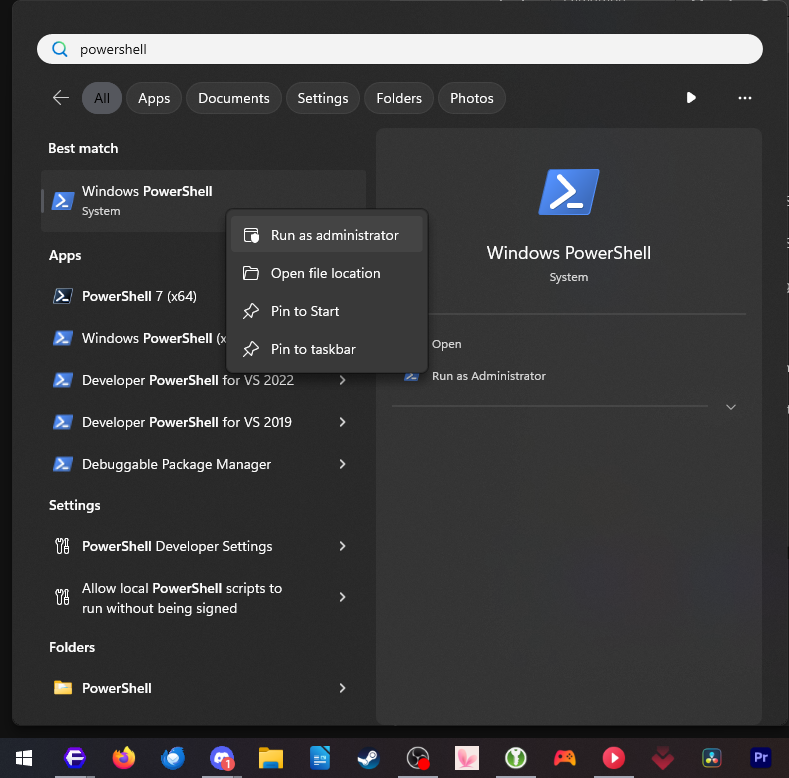
Hit your Windows key on your keyboard and type in powershell.
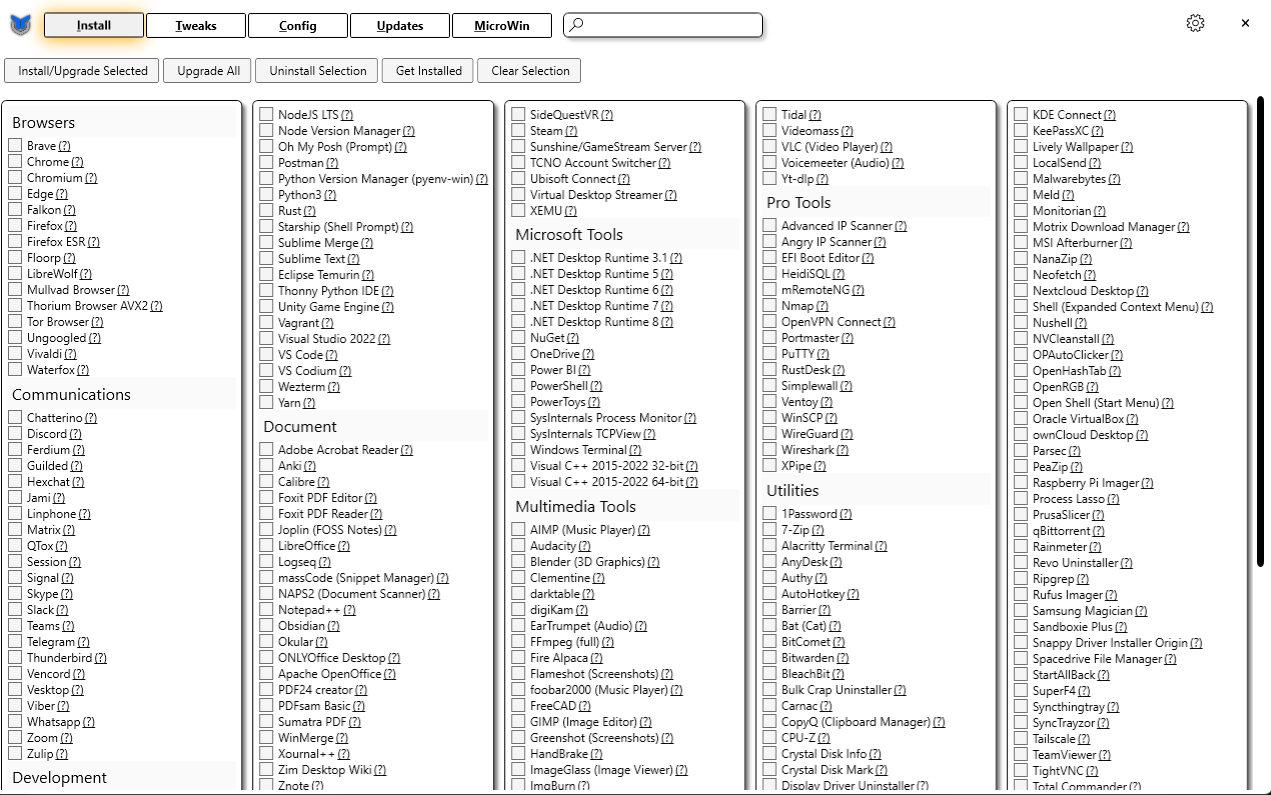
Once the utility is opened, you should have a window like this:
Once in here, select the options I have in the screenshot below:
|

Gaming
Baldur's Gate 3 - Party Limit Begone Mod Guide
| Baldur's Gate 3 - Party Limit Begone Mod Guide |
|
|
Step 1: Download the files to the right first! |
|
|
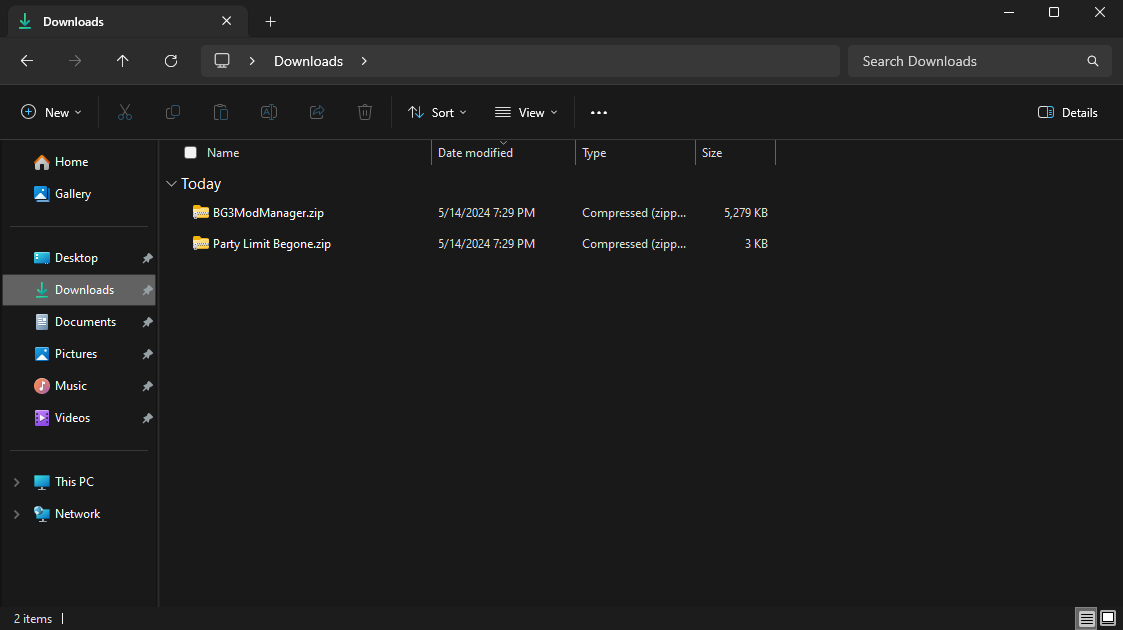
Step 2: After downloading the files, navigate to your download folder. This should be located here: |
|
|
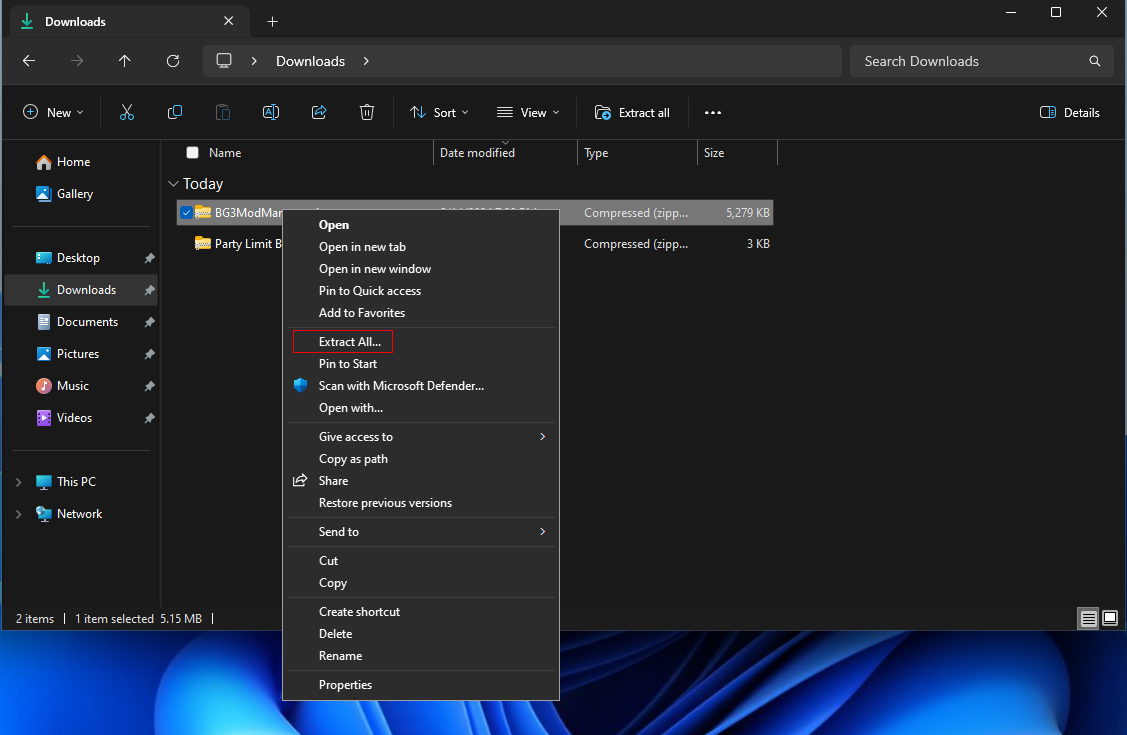
Step 3: Right click on BG3ModManager.zip and choose Extract All... |
|
|
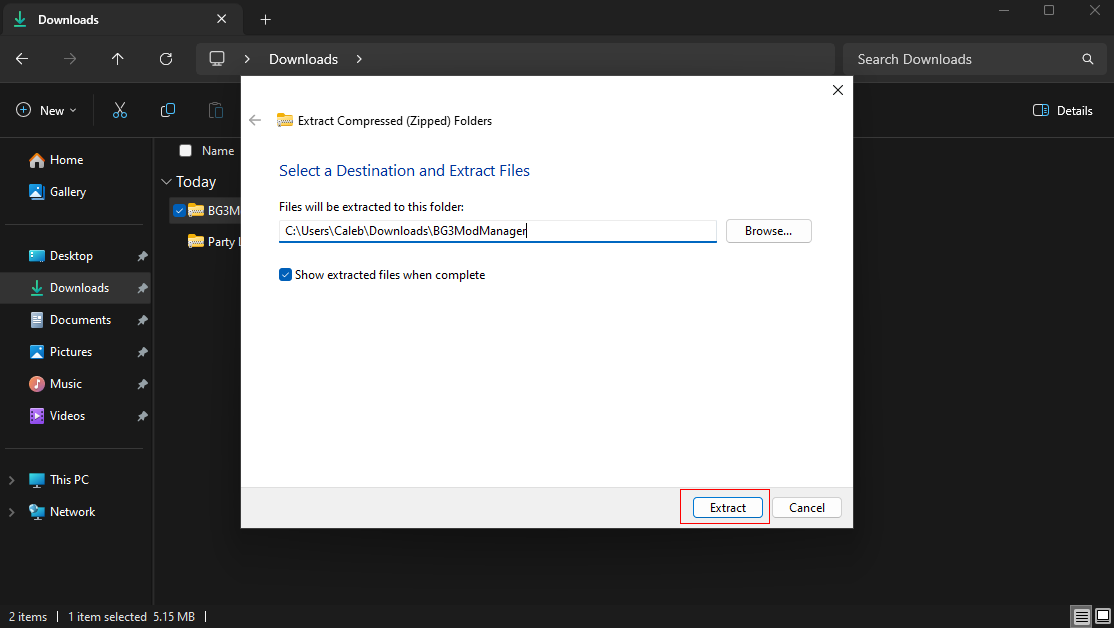
Step 4: Click on Extract and this will extract into your Downloads folder.
Note: You can change where it extracts by clicking on Browse... |
|
|
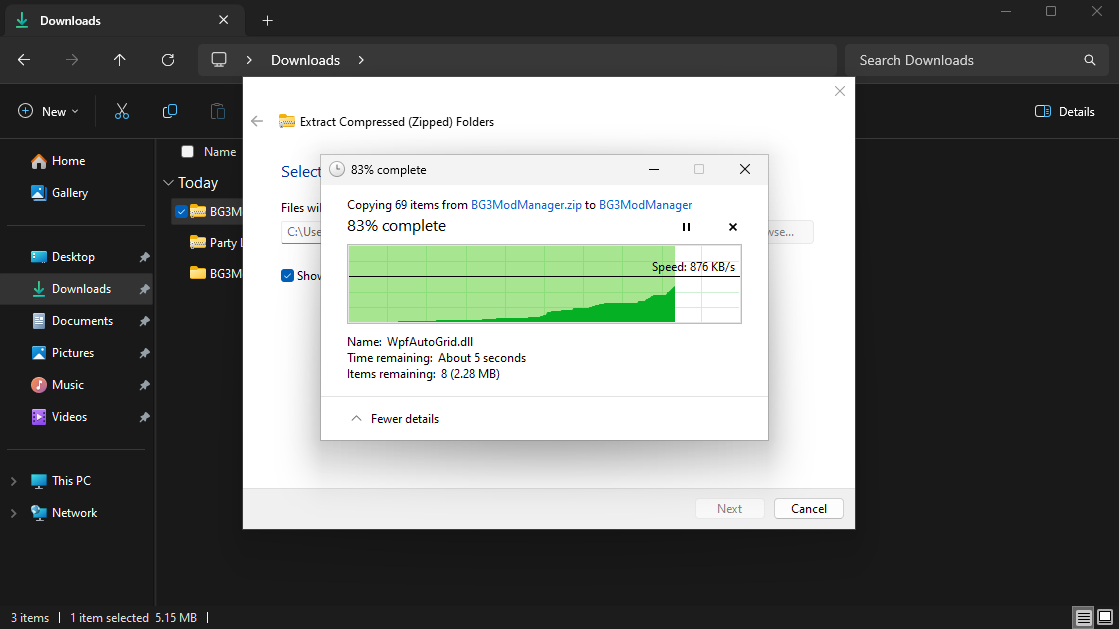
Step 5: Wait for the files to extract. |
|
|
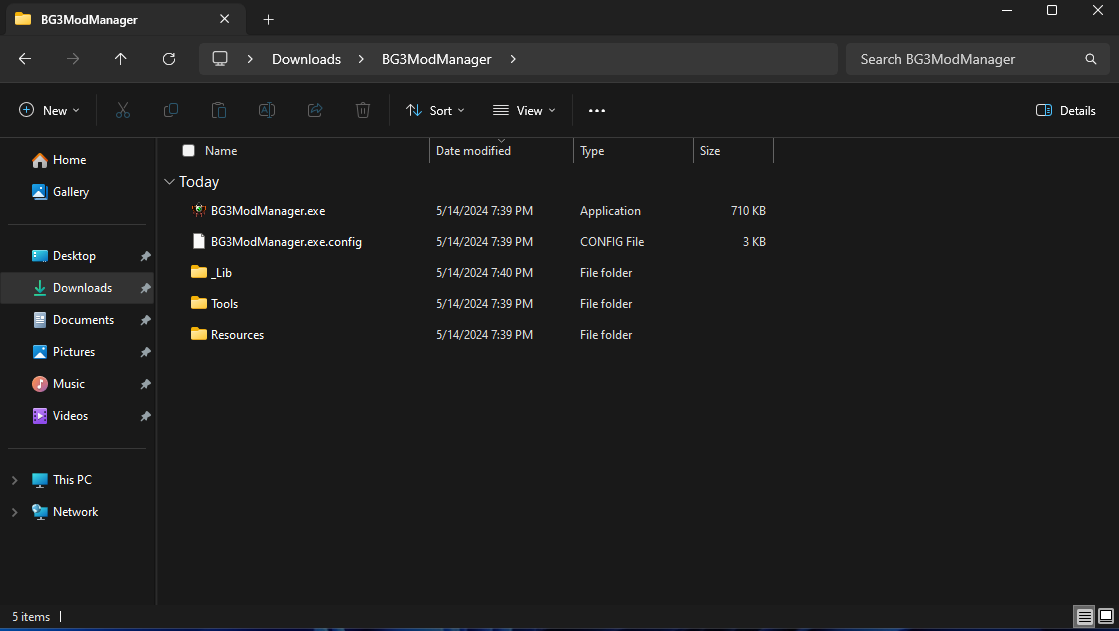
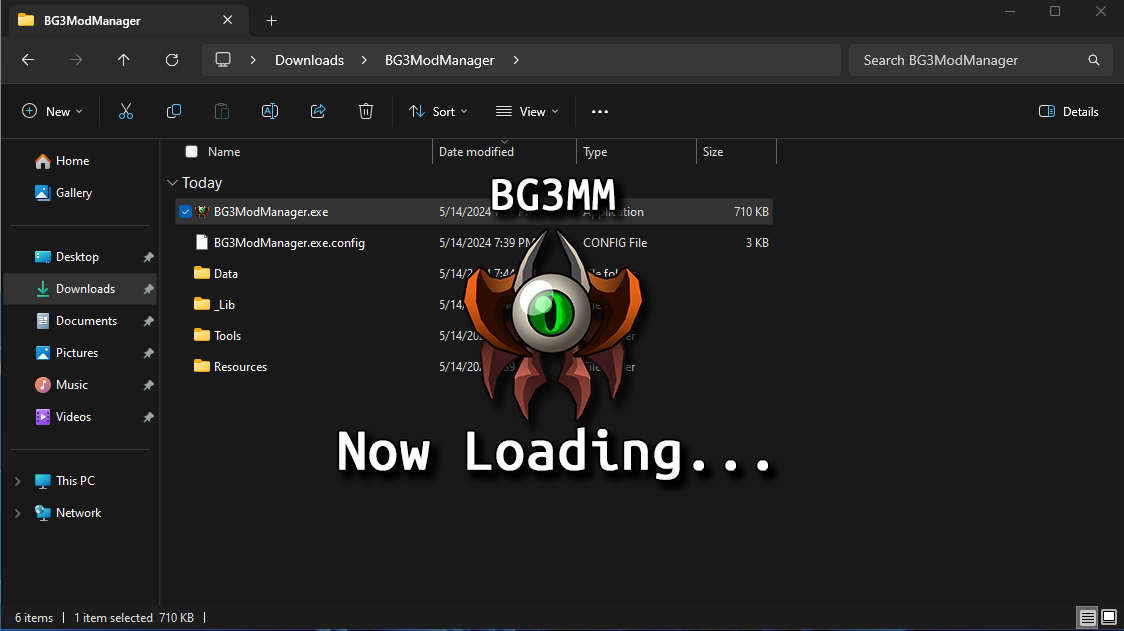
Step 6: You will now have the folder for BG3ModManager open up. |
|
|
Step 7: Right-click on BG3ModManager.exe and Run as administrator. |
|
|
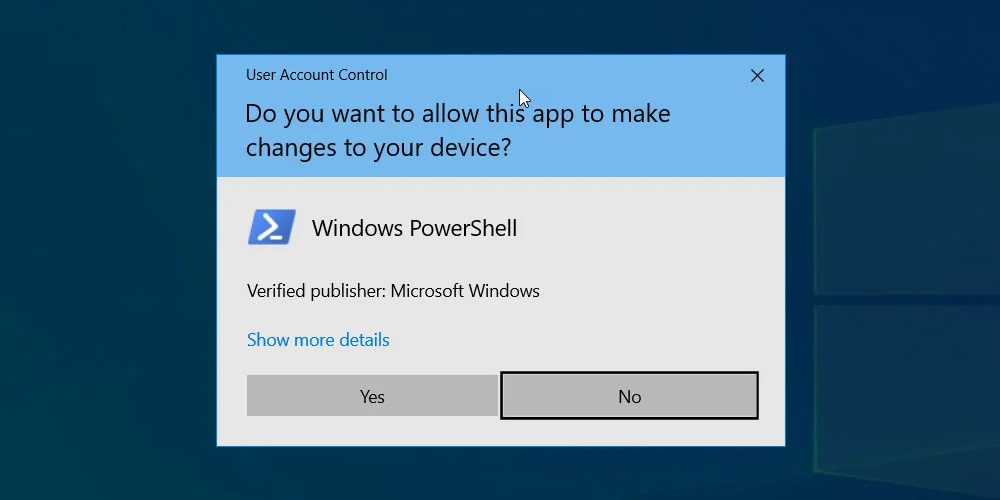
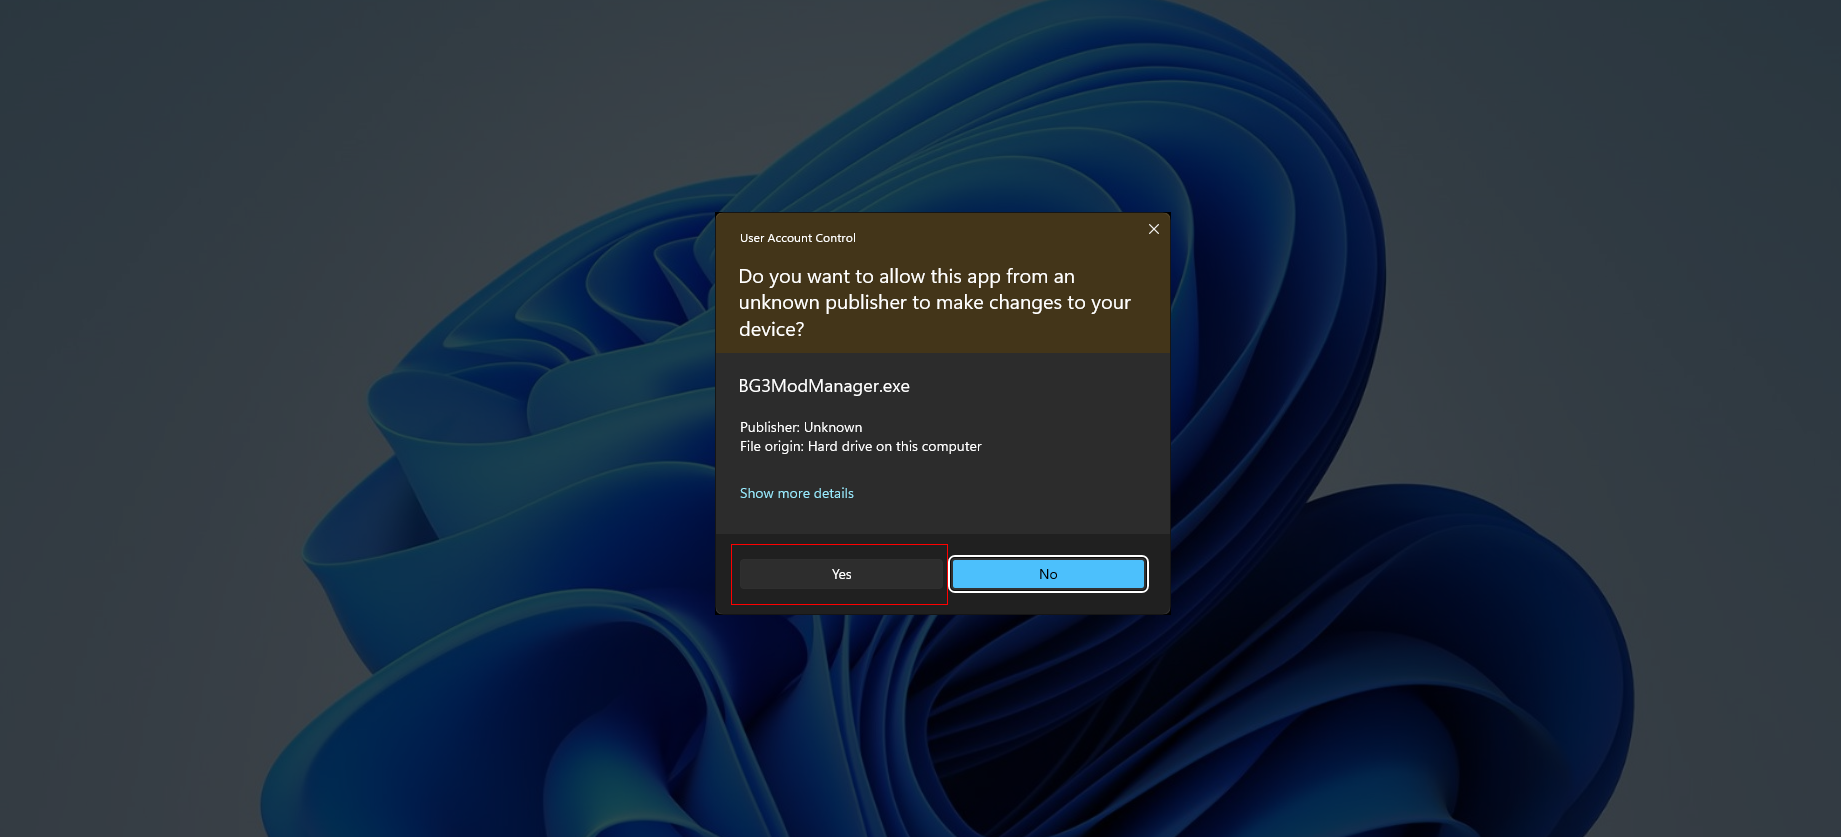
Step 8: You will get a User Account Control prompt. Accept it by clicking on Yes. |
|
|
Step 9: The game should detect the path to the game folder for Steam. |
|
|
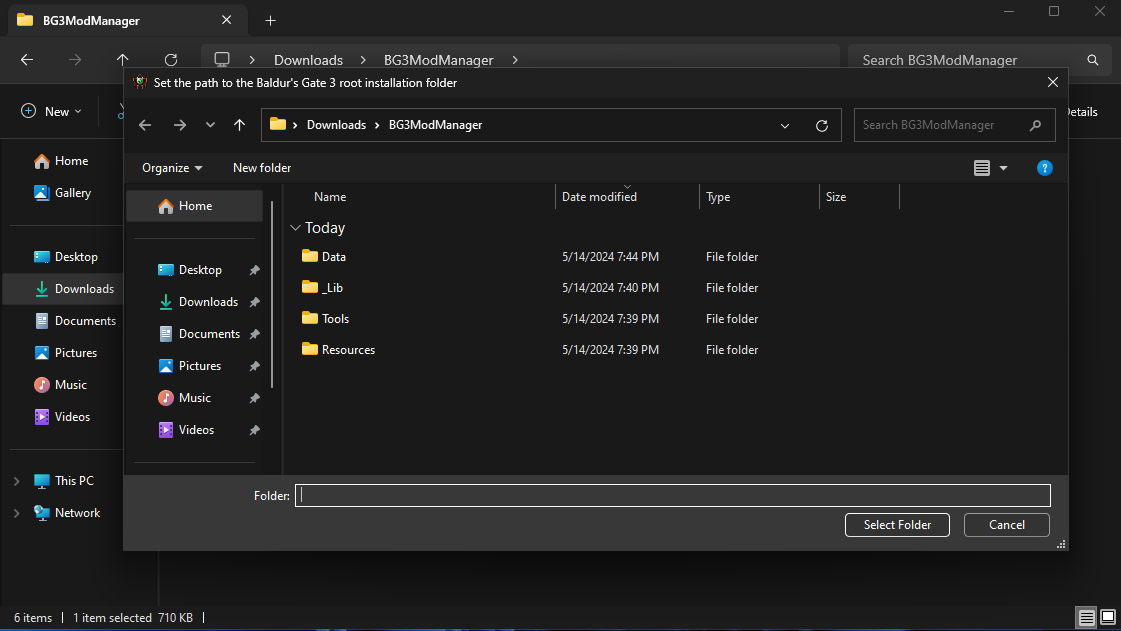
Step 10: If the game does not detect the path to the game folder and pops up with this, navigate to your Steam games directory. |
|
|
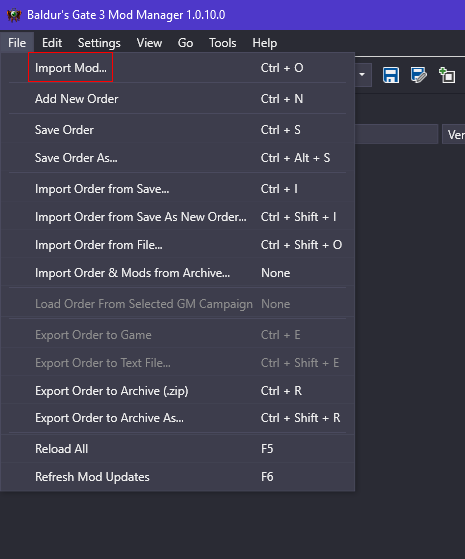
Step 11: Now we are going to import the Party Limit Begone Mod. Click on File > Import Mod... |
|
|
|
|
|
Step 13: Once it is done importing, confirm it imported by checking here: |
|
|
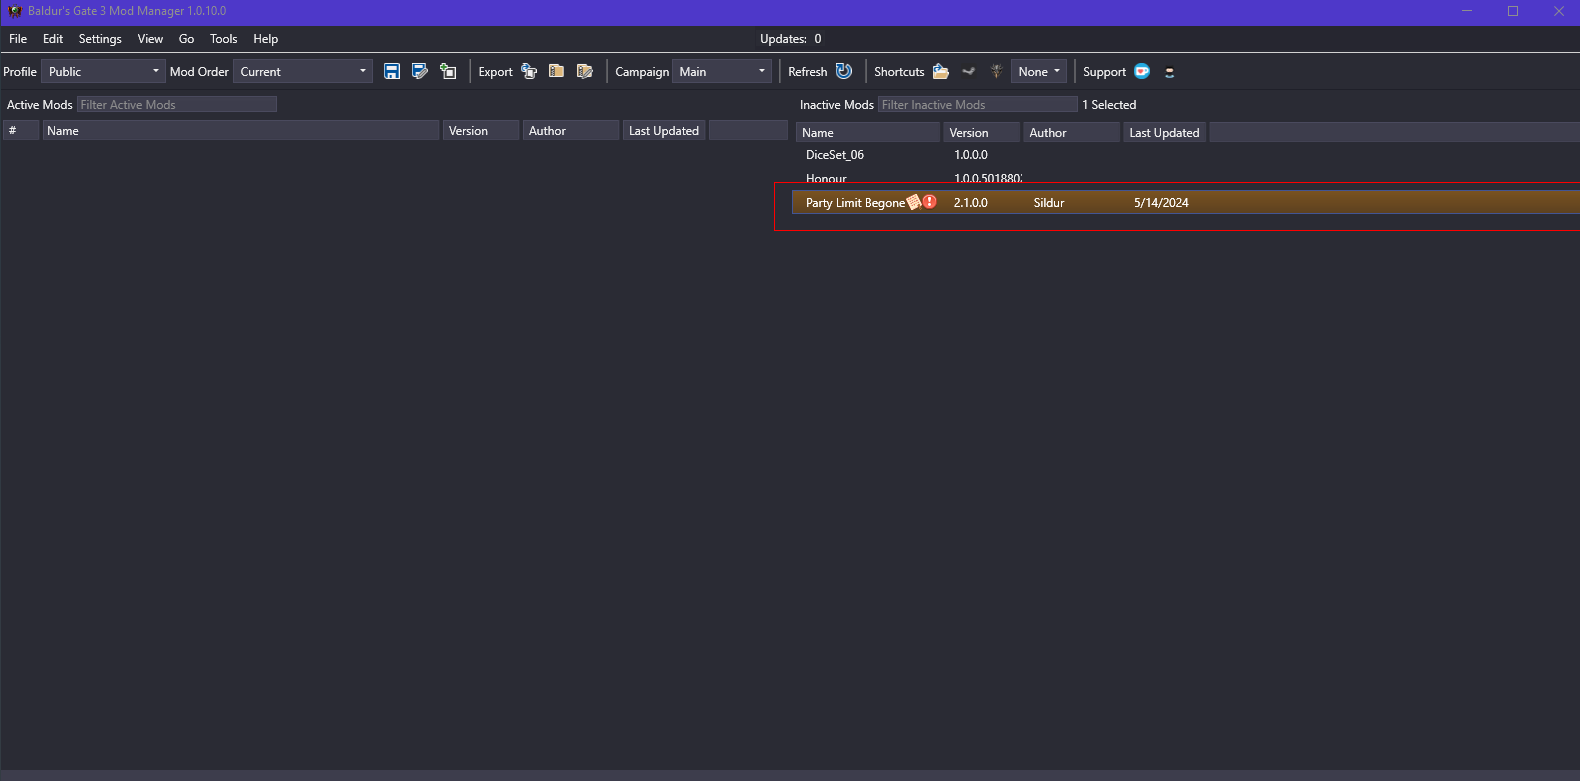
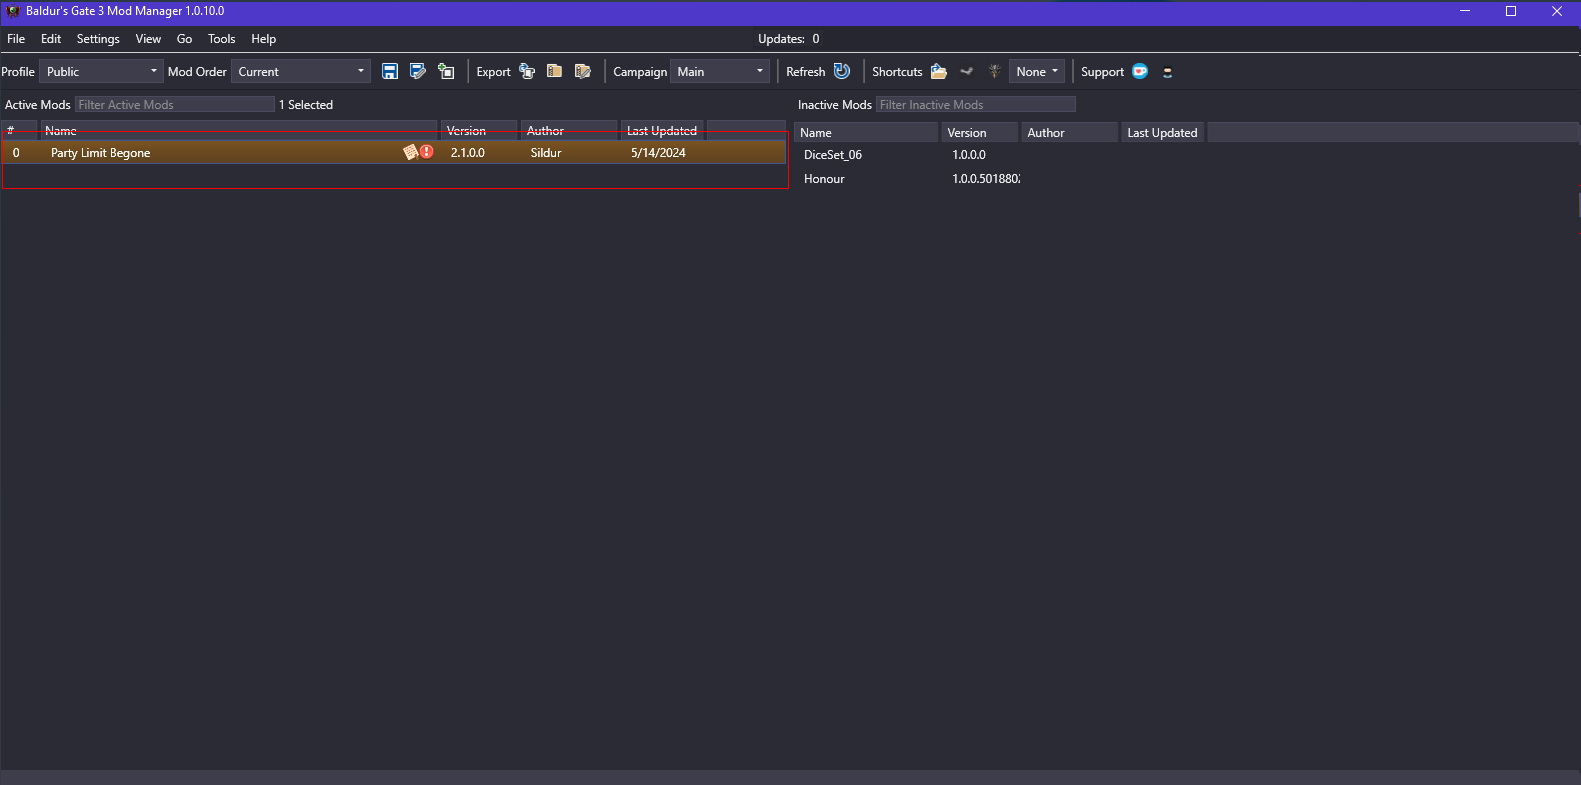
Step 14: If it is on the right of the Mod Manager window, drag it to the left so it is in the Active Mods list. |
|
|
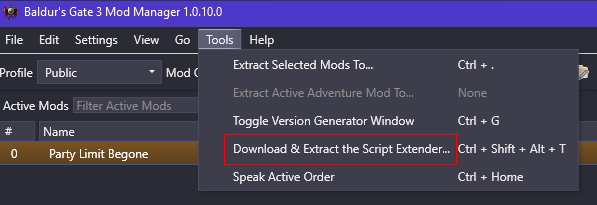
Step 15: Next click on Tools > Download & Extract the Script Extender... |
|
|
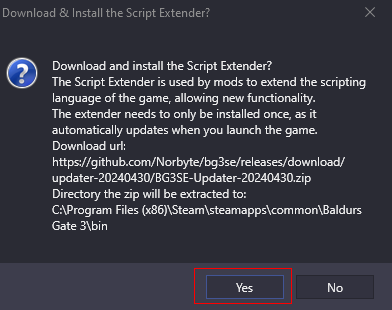
Step 16: Confirm installing the Script Extender by clicking on Yes here. |
|
|
Step 17: You should get this message at the bottom left of the Mod Manager window to confirm the successful installation of Script Extender. |
|
|
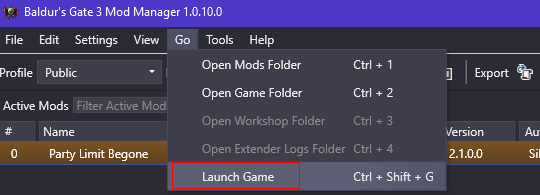
Step 18: After this, test launching the game by clicking on Go > Launch Game |
|
|
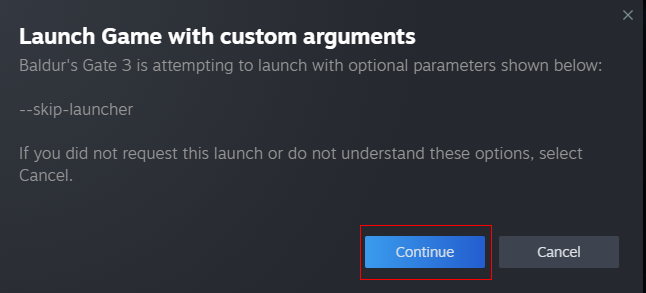
Step 19: If you get this redirect popup to Steam, make sure to click Continue. |
|
|
Step 20: Hopefully it worked, if not, I might have to help you troubleshoot, lol. |
|


How to Turn off Mouse Acceleration - Marvel Rivals Guide
| How to Turn off Mouse Acceleration - Marvel Rivals Guide |
|
|
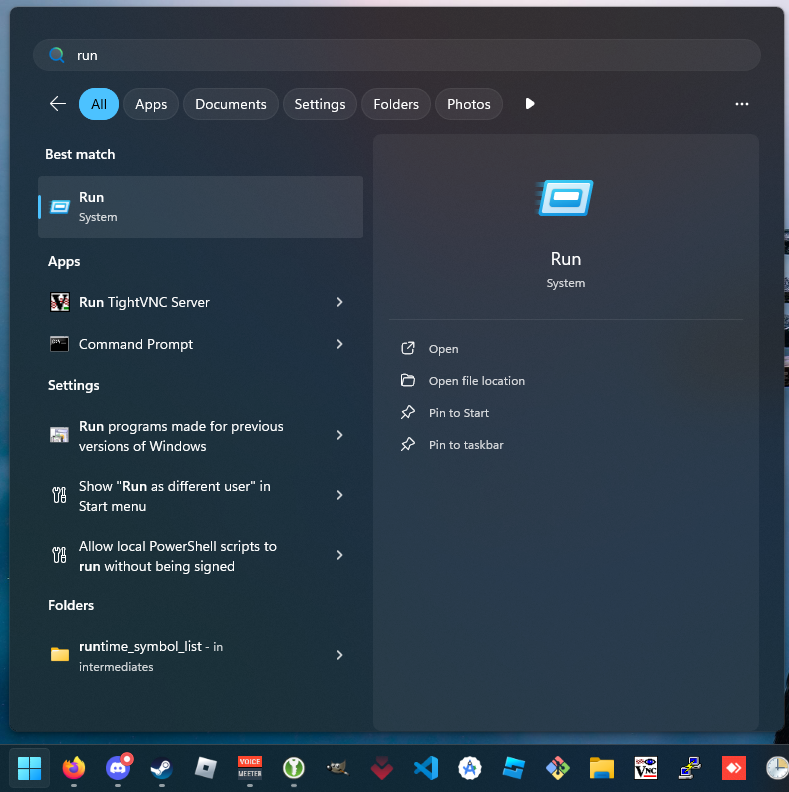
Step 1: Tap the Windows Key on your keyboard and type in run. Open it. |
|
|
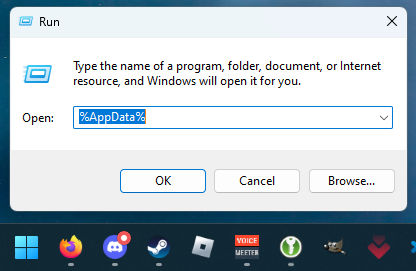
Step 2: Type in %AppData% |
|
|
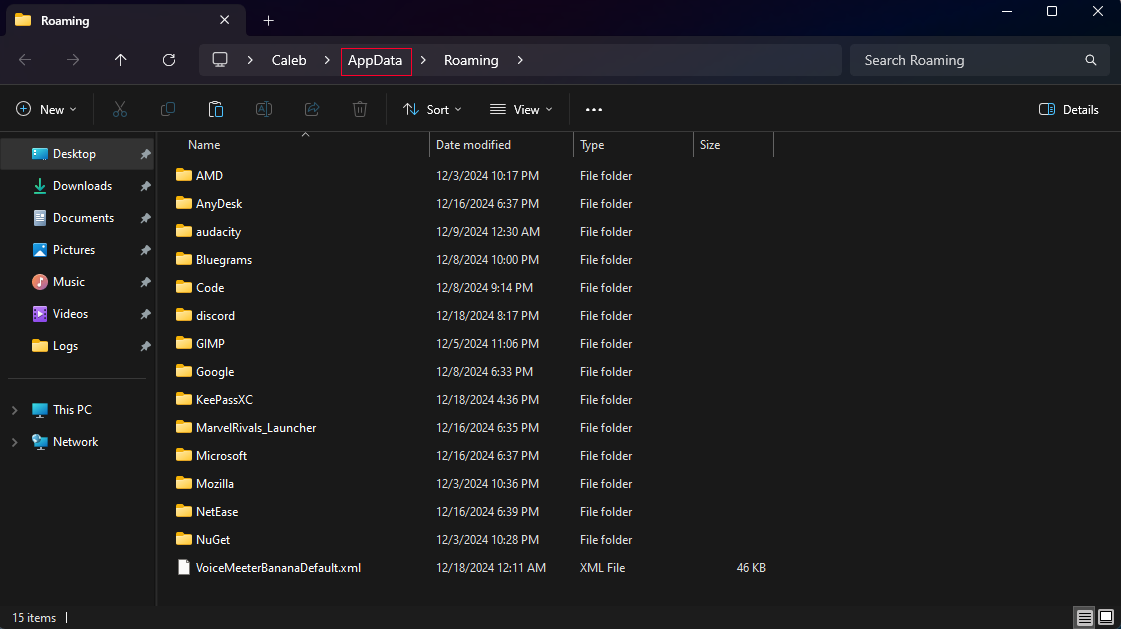
Step 3: Navigate back a folder by clicking on AppData. |
|
|
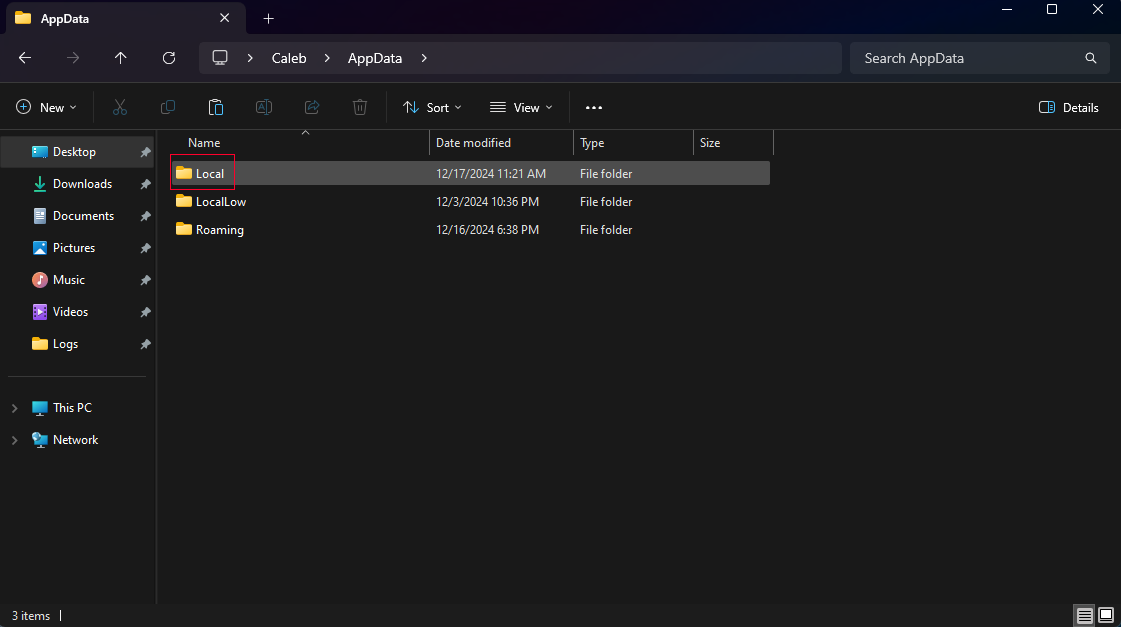
Step 4: Click on the Local folder. |
|
|
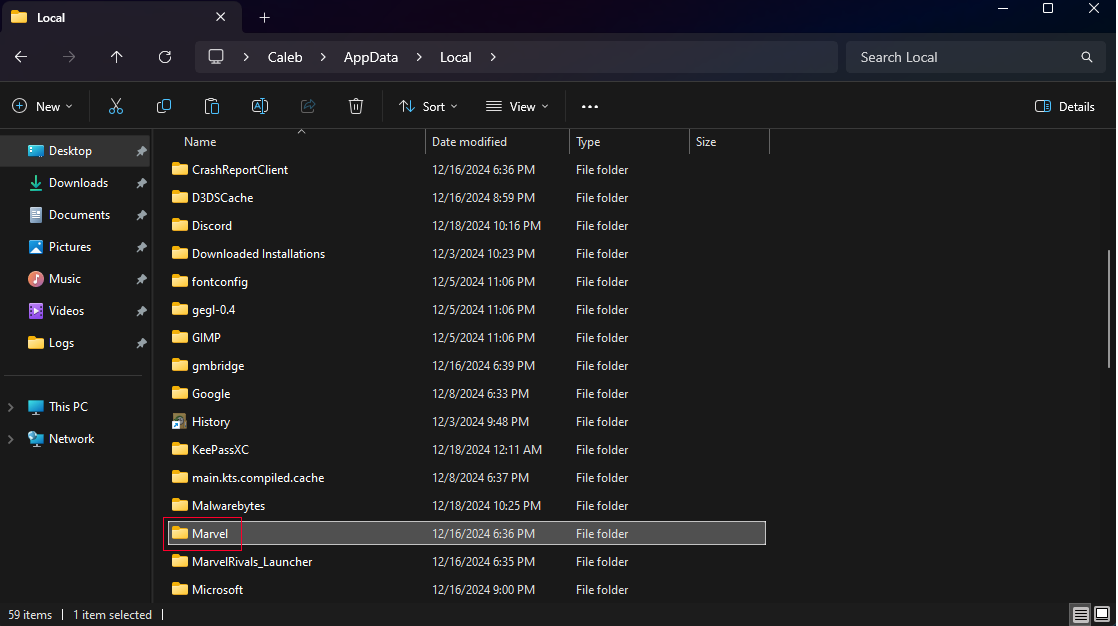
Step 5: Scroll down and click on the Marvel folder. |
|
|
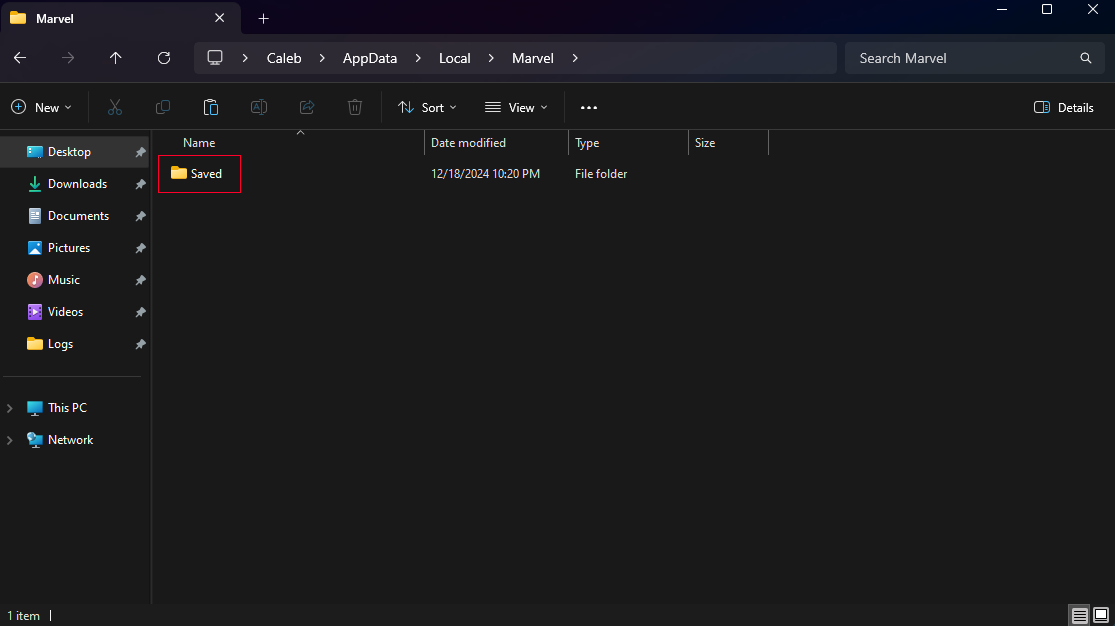
Step 6: Click on the Saved folder. |
|
|
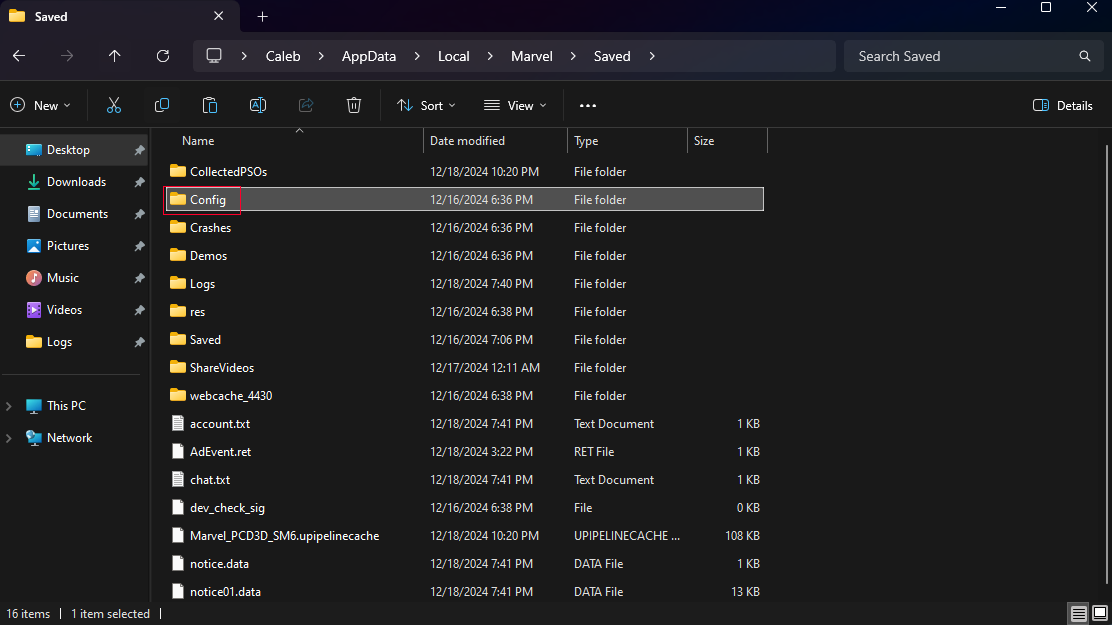
Step 7: Click on the Config folder. |
|
|
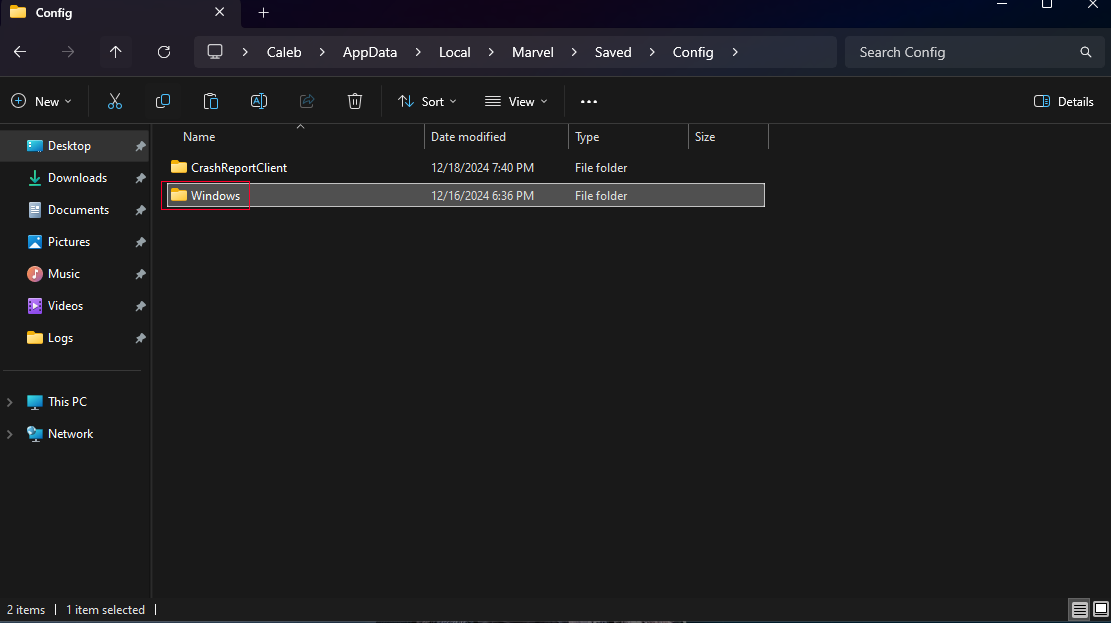
Step 8: Click on the Windows folder. |
|
|
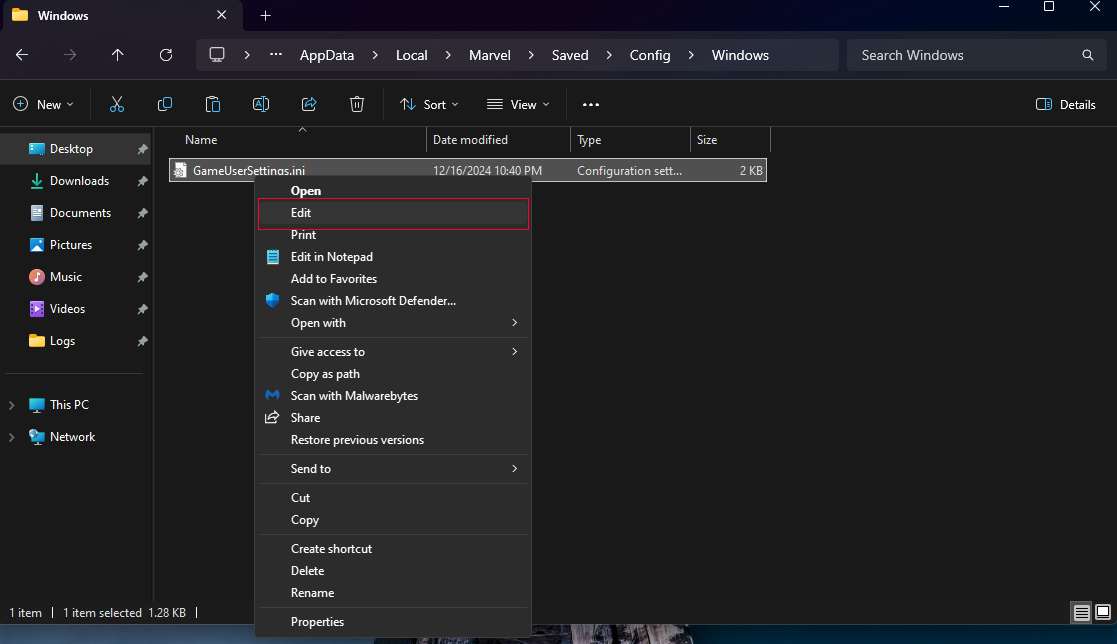
Step 9: Right click the GameUserSettings.ini file and click on Edit. |
|
|
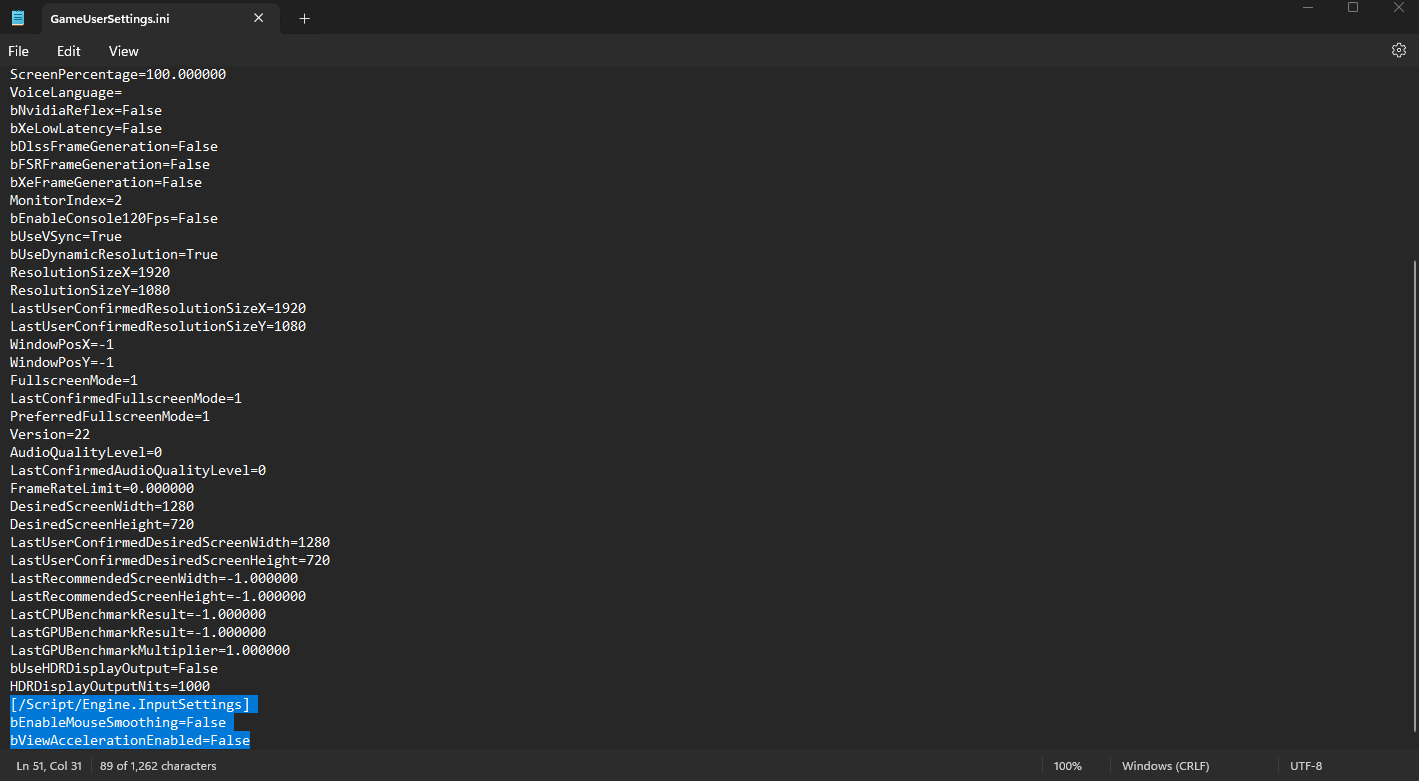
Step 10: Scroll to the bottom of the config file and copy and paste the following text:
[/Script/Engine.InputSettings] |
|
|
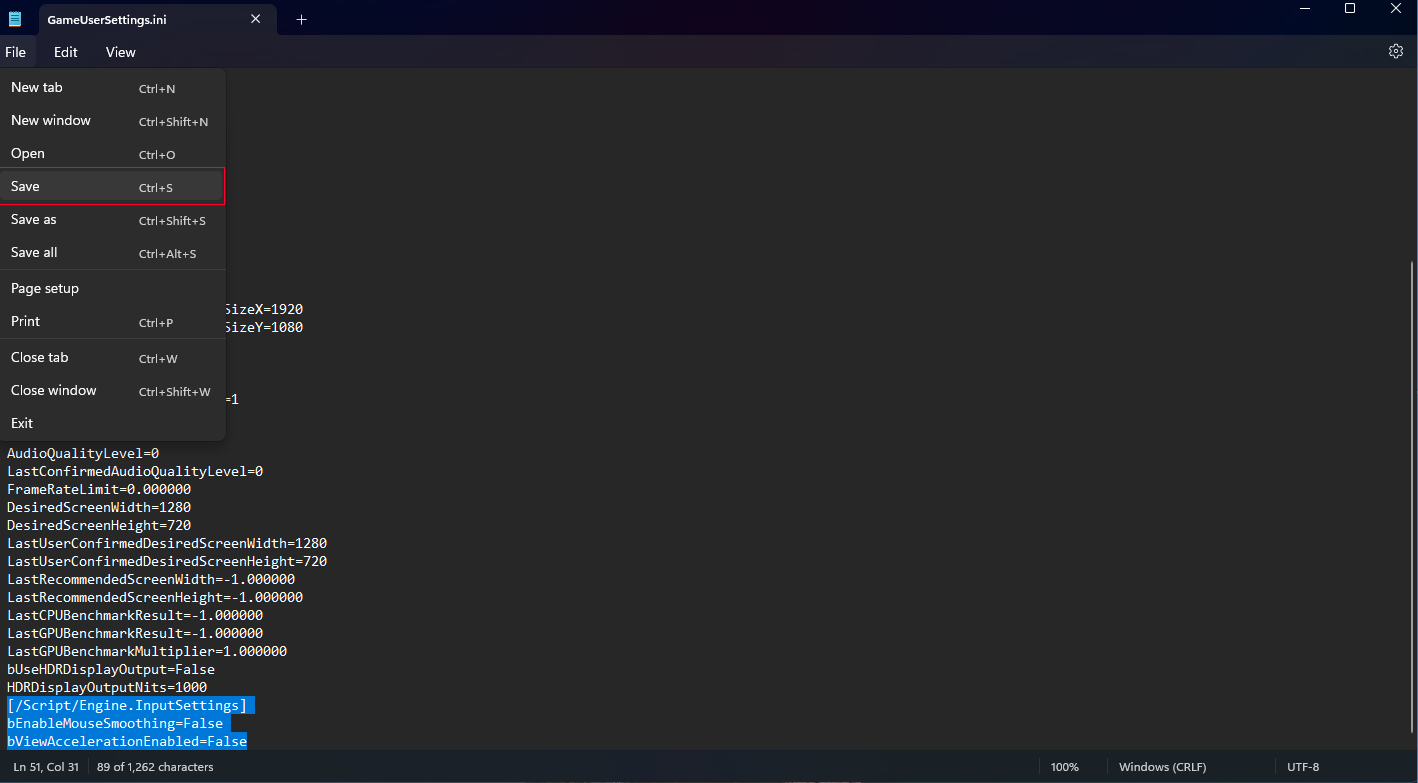
Step 11: Save the config file and close the Notepad window. |
|
|
|
|
|
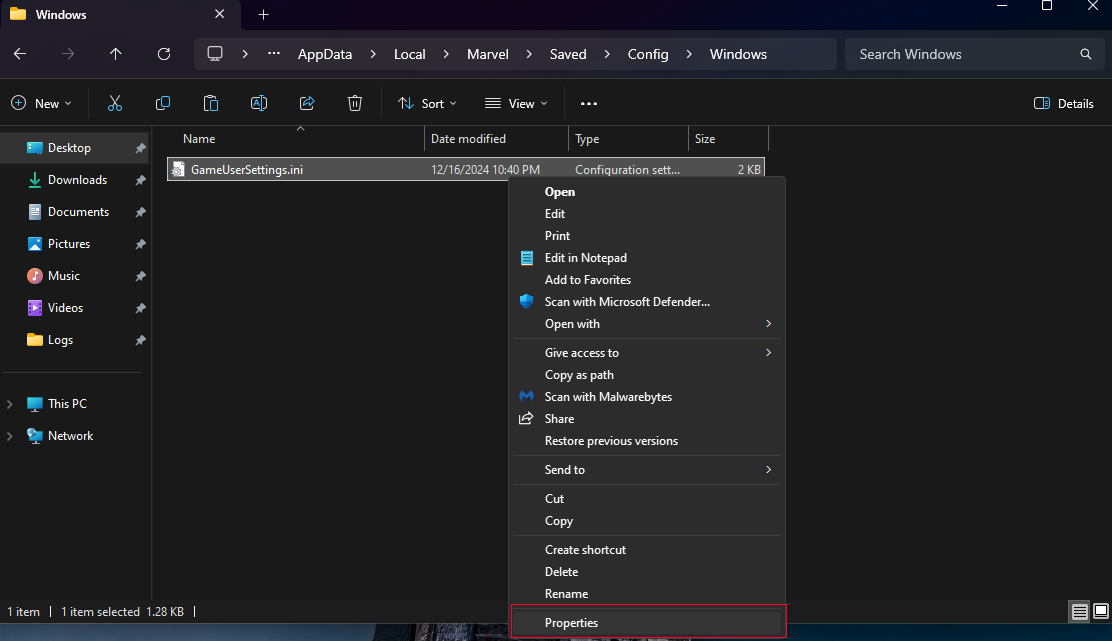
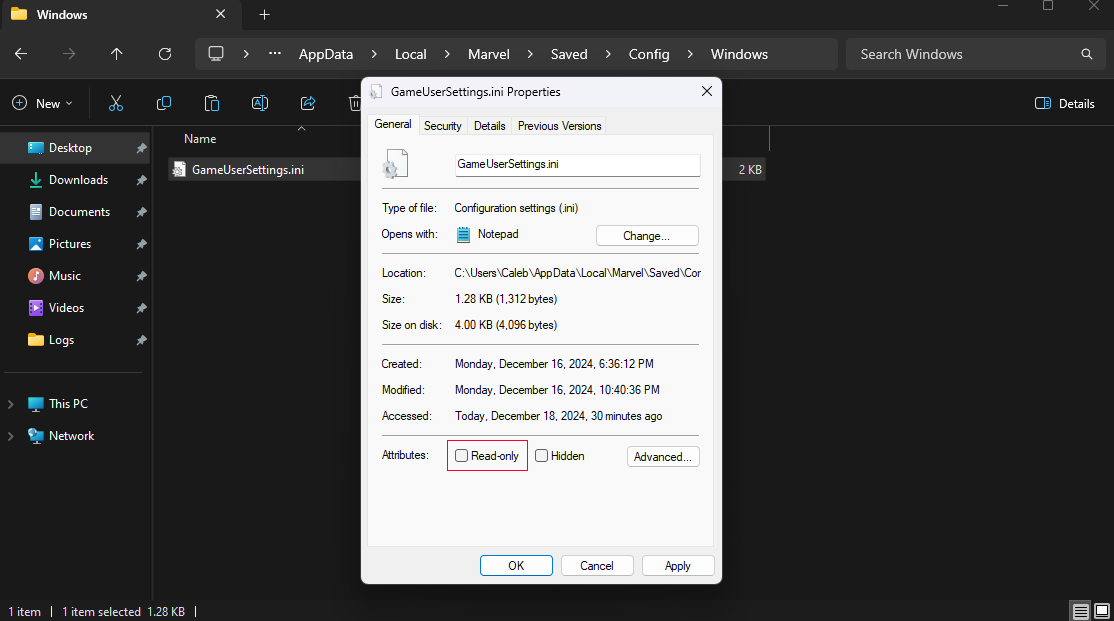
Step 13: Turn on the "Read-only" attribute at the bottom of the popup. |
|
|
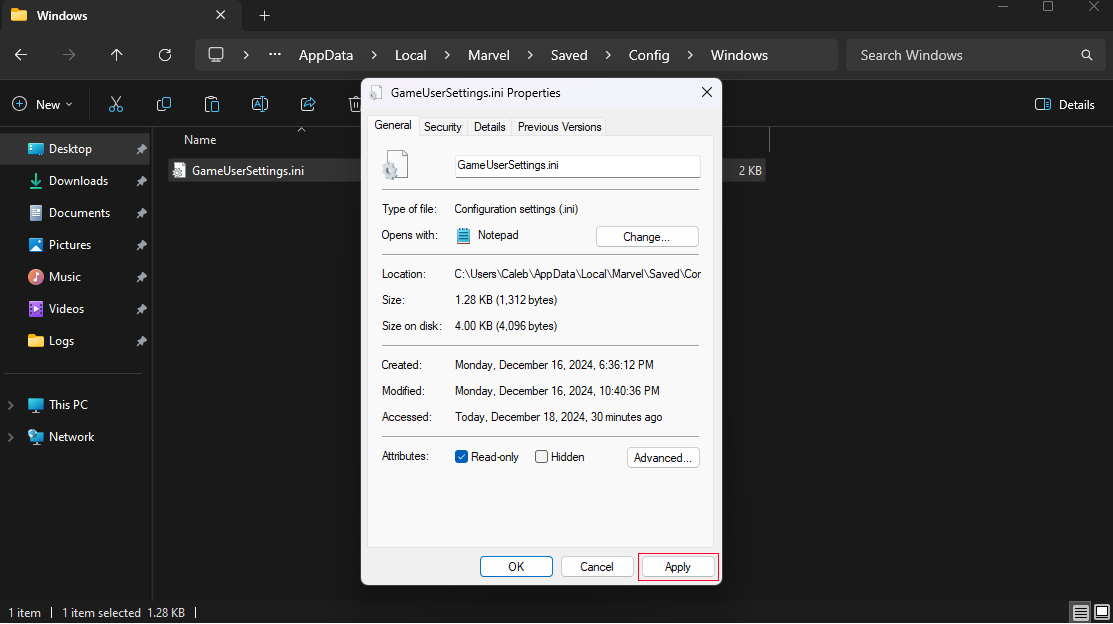
Step 14: Now click on Apply in the bottom right side and click OK. |
|
|
Step 15: That's it! You are done and ready to play the game! The reason why you make it read-only is so Marvel Rivals dev's don't undo what you just did! :) |
|